
How do I install my dash camera?
Z-edge dash cameras come with a suction cup or sticky adhesive mount. This guide explains how to install the front and rear car dash camera as well as hide the cabling using to tool provided.
WARNING:
Do not install the device on a window with a tinted film on it – doing so may damage the tinted film.
Connect the dash camera’s power lead to your vehicles lighter socket /auxiliary power. Connect the other end to the dash camera.
Turn the camera on. While looking at the display screen, find a suitable location for installing your dash camera on your windshield.
Please note
a. This position should neither distract the driver nor block the driver’s view while driving. We recommend locating towards the top of the windshield, behind the rear-view mirror, and positioned slightly closer to the driver’s side. Find a position that provides an unrestricted and full viewing angle for the camera.
b. This position should be clean so that the adhesive mount can attach to the surface firmly. If not, please clean the surface using water if necessary and wait until dry.
c. This position should be close to the cigarette lighter (power) in the car to ensure charging while recording.
Suction Cup Mount
Most of the zeroed dash cameras such as the Z2, Z3D, Z3G, Z3Pro, T3, T4, F1, among others, come with a suction cup mount.
Follow these steps to install a dash camera with this type of mount.
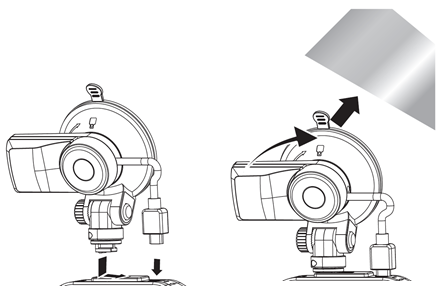
1. Slide the car mount into the slot on top of the device until you hear a click.
2. Peel off any protective plastic backing from the suction-cup. Ensure the windscreen where you wish to install the camera is clean and dry.
3a. Having found a suitable location on your windshield, place the device on your windshield, and firmly press down on the lever to secure.

3b. Having found a suitable location on your windshield, press the suction-cup firmly against your windshield, and rotate the lever clockwise (12 o’clock) to the lock position.
Adhesive Mount.
Some dash Z-Edge dash cameras such as the S3 have an3M adhesive mount for the front camera.
Follow these steps to install a dash camera with this type of mount.
1. Having found a suitable location on your windshield, remove the protective backing and firmly press the adhesive strip against the windshield until secure. Ensure the camera is orientated correctly and level before applying pressure. The camera is now securely attached to the windshield.
Rear Camera Installation
For Z-Edge dual camera dash cams, you can follow these instructions to install the rear camera in your rear window. Rear cameras all come with 3M adhesive backing.
1. Connect one end of the Mini USB cable into the Mini USB Port on the dash camera. Connect the other end into the Mini USB Port on the rear camera.
2. Turn the camera on. The rear-lens view automatically appears on the display screen in dual Picture-In-Picture (PiP) format.
3. While looking at the display screen and without removing the adhesive backing, find a suitable location for installing your rear-lens camera on your rear windshield.
4. Having found a suitable location on your rear windshield, peel off the protective plastic backing from the adhesive mount. Press firmly against your rear windshield to secure.
For a more organized car environment, see hiding the power/data cable.
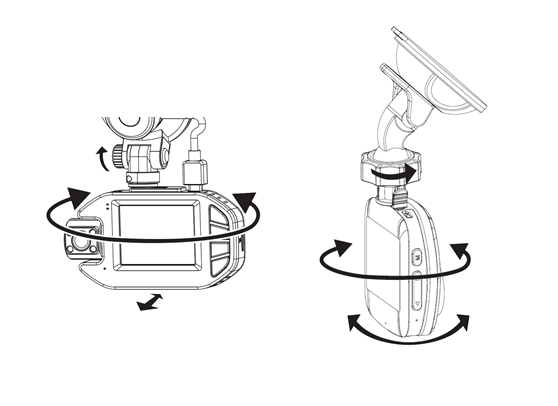
Adjust Device Position
For suction cup mounts loosen the nut on the mount then swivel the device vertically or horizontally.
Tighten the nut to secure the device in position.
Hiding The Power/Data Cable
For a cleaner installation, we recommend tucking the cable behind the trim in the vehicle.
Front Camera
1. Use the hand tool provided to tuck the power cable into the headliner.
2. In most cases, you can tuck the power cable behind the rubber trim along the A-pillar and door frame, use the hand tool provided or gently tug on the rubber trim to remove it to make room for the power cable. You can put the rubber trim back in place after using the hand tool. In rare cases, it may be necessary to remove the A-pillar cover.
3. Trace the cable down the side of the door to the floor of the vehicle. Then lift the carpet in the passenger side footwell and trace the cable beneath this.
4. Alternatively, route the power cable down the door and tuck it behind/below the glove box. Use the cable clips if required.
5. Bring the cable out by the center console to the power socket.
Rear Camera
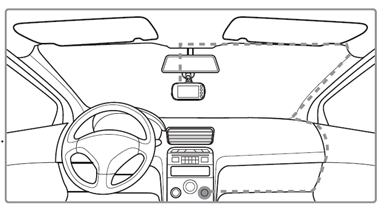
1. Use the hand tool provided to tuck the power cable into the headliner.
2. Run the cable around the roof of the car to the rear windshield then out to the dash camera.
Alternatively, you can run the cable down by the door sill, behind the side step panel or under the carpet to the back of the vehicle, and then up the C pillar to the headliner.
See the dotted lines in the diagram below.

Note: Consult your vehicle’s technical manual or consult a professional if you are not sure how to remove interior panels.
For more specific information, you can refer to the user manual of your Z-Edge dash camera for details on how to install it in your vehicle.